
Step 1: Making slips
I started with organic sweet potatoes from the grocery. Next year, I'll have saved a few of this year's potatoes, but you have to start somewhere. Organic is definitely the way to go if you have to buy your potatoes. Not just because it's better for your health, but from what I understand, conventional sweet potatoes are sprayed with something to make them NOT sprout and you definitely want them to sprout. That's the whole point...
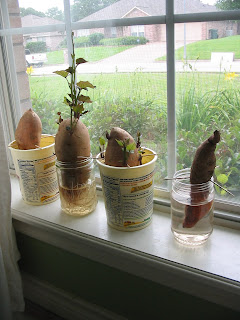
Ok. Now, you take the potatoes and put them in a jar or cup. If it won't wedge into the cup and hold itself up about halfway, you'll need to stick the potatoes with toothpicks to keep it standing up. Put the jars in a windowsill where they'll get plenty of light. It'll take a few weeks, but eventually, you'll see eyes develop, and then those eyes will grow and grow and grow! When the eyes are about 4-6 inches long, just twist them off at the base and you have 1 slip. You'll get multiple slips per potato. I used three potatoes and got 14 slips out of them before washing them and eating the potatoes for dinner :)

Note: Keep an eye on the jars. You may need to add water from time to time to keep the bottom of the potato submerged.
Step 2: Rooting the slips
Once you have your slips (and keep in mind you don't have to do all the slips at the same time), place them either in another jar of water or in very wet play sand. I tried both methods and they worked equally well, but I enjoyed the jar method better because I could actually watch the roots grow. Keep the sand wet, or if you're just using water, make sure the level of water in the jar stays adequate to cover the growing roots. The jars of water can stay on the window sill. I put the slips rooted in sand out in the yard in the sun. You'll need about 2 weeks of root growth before your ready to plant.
Step 3: Planting the slips

Planting is the easiest step of all. To prep the beds, I used the same soil I use for the other veggies, except I added a bag of play sand to each sweet potato bed because sweet potatoes like sandy soil. It turns out, this also makes them easier to harvest because the soil doesn't get compacted. Sounds good to me!
I planted 6-8 slips per 4x1o foot bed (and a full 1 foot deep). Each slip produces lots of potatoes, as you will soon see. Plant them as deep as you can leaving only a little of the slip sticking out the top of the dirt.
Step 4: Caring for the plants
Over the course of the next four months, the slips will turn into vining behemoths. I had to clip them every few weeks to keep them from taking over the yard. Turns out, you can eat them, if you like...

I kept the beds pretty well watered, watering them the same as I did the rest of the garden. It was so hot here in Texas that the leaves were very limp in the hottest part of the day - definitely an indication they needed water. Otherwise, the leaves and very perky. In the last few weeks of growth, I watered far less (once every few days) as you want the soil to be dry when you harvest them.
Step 5: Harvesting the potatoes
My sweet potatoes got so big, they started coming up out of the dirt, so I had no trouble identifying where the original plant was placed. The key here is to be careful and try to not damage on nick the potatoes as you extract them. Gently, dig around the potatoes with your hands, removing excess dirt. Some of the potatoes were small, others were huge, measuring the full 1 foot depth of the bed. Bring it on!
Now, this is something I didn't know. There are potatoes, but there are also lots of more undeveloped sweet potato-y roots chunks. These smaller pieces, I went ahead and washed and put in the fridge for stir fries. The ones that actually look like potatoes? Just set them aside. Do not wash them or let them get wet!

Step 6: Curing the potatoes
This step doesn't seem to be an exact science. I mean, you can eat the potatoes immediately, for sure, but if you let them sit out in the hot, humid air, they actually get sweeter and will be preserved for winter. Now, I had A LOT of potatoes per plant and preserving them was really the only way to go.
For at least 10 days, set the potatoes in a place where it's warm and humid. My back porch did the trick. I first laid newspaper down, placed the potatoes on top of the paper, covered them with my compost sifter (so no critter could carry them off) and then covered the sifter with a tarp - just in case it rained one night and I didn't want to rescue potatoes at 3:00 in the morning. Call me lazy. But hey, it also helped to keep the air around the potatoes warm and moist.
Step 7: Storing the potatoes

After you've allowed them to sit on the porch for
a good 10 days to two weeks, gently brush the dirt off with your hands (remember, you don't want to wash them until you use them), and place them in a box (I used a rubbermaid tub) with newspaper both underneath and on top. I placed mine in our coat closet which is pretty much the coolest darkest place in the house. I understand they keep best in 60 degree temps, but our internal house temp is as close as I can get since I don't have a root cellar and you definitely don't want to put them in the fridge. Now, they SHOULD keep all winter.
Cool, huh? That's all I did. Now we'll see how well they keep in that closet, but then, I may eat them all long before winter is over. The fact of the matter, though, is if I can do it, anyone can do it. And not only was it easy, it's darn good eating!


13 comments:
Don't forget to eat the leaves! They're extremely tasty cooked with a little garlic and olive oil. My plants were doing great, until the ducks discovered how tasty the leaves are. The next batch are going into containers I can keep out of reach of my fine feathered friends.
Debra - I was telling that to someone at the farmers' market just this weekend. I tried them too. I didn't like them by themselves, but in a stir fry, they were pretty good!
This was so incredibly helpful. And you have one very envious reader in me. I mean that many sweet potatoes? I could eat them all in a few days.
When one of the farmers told me about conventional farmers spraying of potatoes to prevent sprouting I thought he was pulling my leg. I mean really now...why would anyone do that? That is as good as those suicide seeds that can't be saved.
I've gotten good at figuring out how to store potatoes because I was constantly sprouting potatoes at home. I found a dark, dry place use an old usps box to store my potatoes.
Be sure to have some of your delicious sweet potatoes in my name.
Beany - Actually, the photo only shows 2 plants worth of potatoes and I have 14 plants, 8 of which I have yet to dig up. It's been raining so much lately, the ground doesn't stay dry enough to dig them. I'm hoping by the end of the week, I'll be able to start curing them. It'll be interesting to see how many I end up with. I'll be sure to enjoy a few in your honor :)
Great post. I've been thinking about doing some container gardening in my very small backyard area. I never considered potatoes, or any other type of rooted vegetable because it looked to difficult. I didn't even know you grew them from the slips (actually, I didn't even know they were called slips), but it's sounds fairly simple.
Also, did I understand right, that you are still able to eat the potato that you got the slips off of? How great is that!
Gil - Sweet potatoes would be super easy in a container garden! And I didn't know about the "slips" either. I kept looking for seed potatoes. But my farmers' market mentor set me straight and guided me through the whole process. And you just soak potatoes to make the slips, so once you take the slips off, you just cook up the potato - a little taste of the harvest to come... :)
My Wife's Grandfather taught me how to raise sweet potato slips the old fashioned way - in case you ever want to start a lot.
.
"Plant" the potatoes in a mixture of sawdust and sand in a hot bed - heat tape or fresh manure under the planting layer.
.
You harvest the slips by probing under the sawdust and breaking them off as they are ready - 8 inches or so. More will grow for several cycles if you keep it warm and watered.
.
He used to bed slips every year and gave them to anyone who wanted them. The only time I ever did it his bed failed and mine saved the day.
David - Thanks for the tips! I bet that would work really well with Gil's container garden!
Oh man, I'm going to have to try this. But I'm running out of garden space! Renting sometimes isn't the greatest, although I shouldn't complain because the manager let us dig up a large portion of our backyard for gardening.
I might have to line my driveway with buckets. Seriously, I love sweet potatoes (the best is baked, mashed with soy sauce, and eaten with a ton of sauteed veggies. Yum!), but they're just too expensive for me to buy from the store.
Thanks for the informational post!
I am definately going to try this. We were going to try sweet potatoes this year but for some reason didn't get it done. My question, what's the time frame. If I wanted to set my plants out in April, when would I start my sweet potato in a jar to get it to sprout? Thanks for all the great info on your site. I love it.
Enjayw at Apple Tree Farm - One of the vendors and I were talking this morning at the market about how mysterious potatoes once were. Once you do them, they are totally easy. Good luck with yours!
If you want to plant in April, I'd start slips at the end of February, early March. It takes several weeks to get the slips long enough, and then you need a couple weeks to root them. Have fun!
i have a question regarding the slips, i have had 3 potatoes in cups for weeks now only one potato has roots coming out of the bottom. The roots are the slips, correct? how do i get leaves on them? none of my potaotes grew leaves out the top
Remember in your container pots, plant your sweet potato, then plant petunias or a taller flowering plant like echineaca on top then you will have beautiful flowering pots sitting around with hanging ivy (sweet pot vine) Just saying.
Post a Comment